I am loving rope jewelry right now. Bright, fun, tribal, and perfect for Spring. In my opinion, Holst + Lee does it the best. This necklace? Wow. Or this one? Oh my. My only complaint is the price tag. People. It’s rope. And cord. With a few brass accents. The cost of materials can’t be more than $20 – and that’s for the really elaborate ones. Some of the pieces are a bit more intricate and will require (hours) of work, but others? So simple. I thought today we’d start slow with this gorgeous single strand bracelet.
 What you will need:
- about 6-7″ of rope, depending upon the length of your wrist.
- the same length of crystal chain
- about 30″ of two complementary colors of embroidery floss.
- two barrel cord ends, sized to fit 8mm cord
- two 4mm jump rings
- one brass clasp
- masking tape
- gorilla glue

Begin by taping your embroidery floss to the rope.

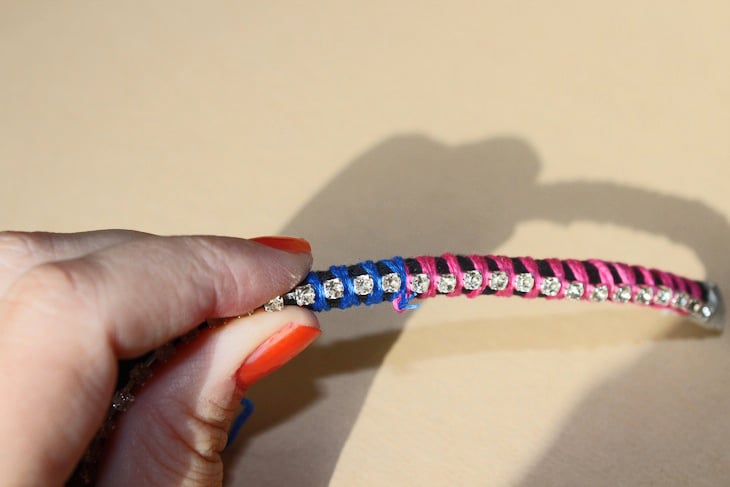
Wrap your embroidery floss around the rope once, and then add the chain – wrapping in between the first two crystals.

Continue to wrap, wrapping around 3x between each crystal.

Hold it steadily, and wrap away. A pattern will emerge!

When you are halfway through, knot on your second color, and keep wrapping.

(Go back and snip off the ends later.)

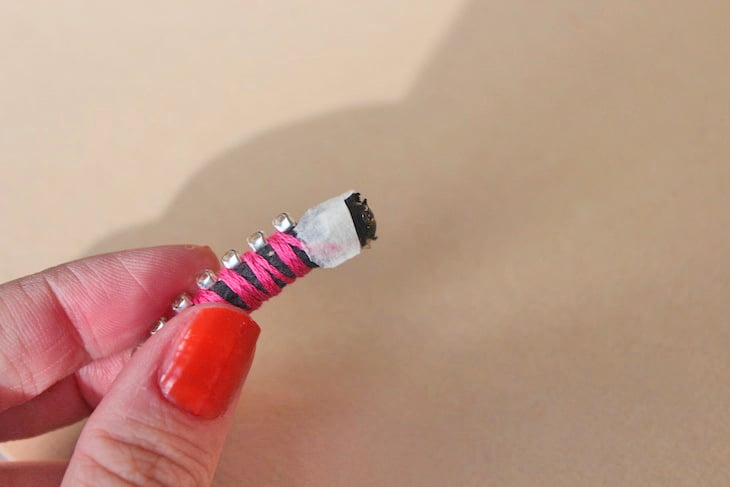
Keep on wrapping… when you get to the end, tape the end down, just as you had done in the beginning.

Apply a small drop of Gorilla Glue to each end, and slide on the end cap.

Allow to dry for 1-2 hours. (Overnight is best, but not everyone is that patient!)

Thread your jump ring through the end of the cap and close it.

Add your clasp…

And voila, your bracelet is complete!


Obsessed with this!!! I totally want to make this in neon shades. Amazing as usual, Grace! 🙂
Wow, that looks so professionally done! It doesn’t have effect of most DIY friendship bracelets – this is really nice and easy to follow!
xoxo
http://www.natashafatah.blogspot.co
Great job Grace! I love the colours 🙂
Laura xo
woah this is the perfect DIY…cute and easy! and just in time to rock during the summer! great job!
xoxo
Candy
http://www.tayloranddemolish.com
This is absolutely gorgeous! Pink + blue is one of my favorite combos at the moment. Makes me want to get crafting ASAP! And I am loving the blog changes! You’re doing a great job! xo
Oh man, I hear ya about the cost of rope jewelry– so ridic! Yours looks fab for a fraction of the price!
You are so creative! Love it!
LOVE this…. want to make a few with different colors! FUnny timing because I just made a crystal headband using the same technique. I was trying to think of how else I could utilize it… perfect! {ps: totally agree… spending more than $20 on rope? pass!}
this is such a great DIY! I don’t usually do DIY but now I’m really inspired to make one!
Love this!! You need to write a book that contains all these fabulous DIY projects.
Can’t wait to try this!
brillant!!!!
love this grace!! you are so talented. I wish I had the crafty gene.
awesomeness!!!
Oh my gosh love the detailing…this came out beautiful Grace.
love this Grace, I want to go to Michael’s and buy everything!!
Beautiful! I bought a rhinestone bracelet for about 25 cents the other day, and now I want to use it for this project. 🙂
Awesome DIY! I always love the stuff Holst+Lee come up with but they are always too expensive!
http://www.absurdlypeculiar.blogspot.com
great diy grace! can’t wait to try. And if any would rather make a magnetic closure like the original then follow instructions in this post
http://dollarstorecrafts.com/2010/12/make-a-rope-necklace/.
So freaking awesome! Love the color combo!
Grace, you’re TOO talented! Love this. Keep up the great work! –TT
Another fabulous DIY! I love how you get a lot of your supplies online, like on Amazon, it makes it so much easier to buy everything!
This looks so pretty 🙂
You amaze me. That is all.
WOW, love it!
This is fantastic! There’s a lot around with sequins and cotton at the moment!!!
I mean….I can’t wrap my head around the fact that you can do that!! yours looks just as good, (if not better) as the original.
<3 Kate
http://www.theforgetfulwife.com
Ahhh so obsessed it looks amazing!
I saw the first photo and thought…no way! And there you go, knocking my socks off again! Could it be so easy? Can you sell your DIYs already? Please?
How long does it take you take make this magic? I tried an experiment today and after a few hours, it was a fail. But hey, I know practice makes perfect, so I have lots to go. But I’m even more in AWE now.
You are so crafty + amazing at these! I would not even know where to begin, seriously perfect!
wow this is an amazing one! love it
oh my gosh, you are a DIY genius!!!!
SO CUTE! I totally want to make one of these right now!
Fabulous DIY! We are loving cord right now too. Must add to our collection ASAP!!!
http://www.RocksPaperMetal.comwww.RocksPaperMetal.etsy.com
LOVE this! adding it to my DIY list… mostly of bracelets of yours that I am crushing on!
xx
Magical! I love these cord jewelry pieces but never knew where to get the cord ends (or what they were called!). I can’t believe how similar yours is to theirs!! Great job! xx
I’m going to make these
Hi!
The link to your blogpost to read ‘more’ doesn’t seem to work. Can u relink it ?Thanks!!
Hi JooJoo,
Thank you for your note! The problem has now been resolved!
I want to make this this weekend– I LOVE IT!!!
Very nice and creative. Loving it Xo
Very nice and creative. Loving it Xo
please check my blog
http://unicornsconfetti.blogspot.com